Removing Objects from 360° “Stationary” Videos
Introduction
In recent years, 360° videos have become increasingly popular in providing viewers with an immersive experience where they can explore and interact with the scene. Taiwan AILabs is developing technology for the processing and streaming of 360° videos. Among the applications of our technology is Taiwan Traveler, an online tourism platform that allows visitors to experience a “virtual journey” through various tourist routes in Taiwan. A challenge we face when creating a 360° video immersive experience is the presence of cameramen in the video, which interferes with the viewing experience. Due to the fact that the 360° camera captures scenes from all possible viewing angles, the cameraman is unavoidably captured in the initial film. This article discusses a method for resolving this cameraman issue during the processing stage of 360° videos.
Cameramen Removal
Cameraman removal (CMR) is an important stage of 360° video processing, which involves masking out the cameraman and painting realistic content into the masked region. The objective of CMR is to mitigate the problem of camera equipment or cameramen interfering with the viewing experience.
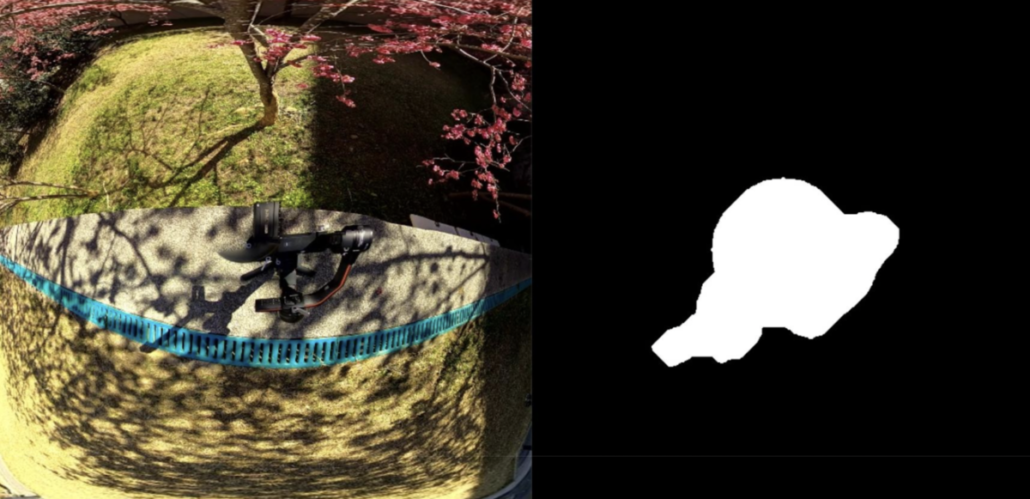 |
| A video frame with a camera and its corresponding mask: Given a video containing a camera tripod and corresponding mask, CMR aims to “remove” the tripod by cropping the masked region and then inpainting new synthetic content therein. |
In our previous blog [1] about cameraman removal, we discussed how we removed the cameraman from 8K 360° videos with a pipeline based on FGVC [2]. However, the previous method [1] is only suitable for videos taken with moving cameras. Therefore, we develop another method to remove the cameraman from stationary 360° videos.
( For most of the demo videos in this blog, we do not show the full 360° video. Instead, we rotate the camera down by 90°, so that the camera points to the ground ( the direction in which the cameraman usually appears), and crop a rectangular region from the camera view. This rotation process is also present in our CMR pipeline, where we rotate the camera and crop a small region for input to the CMR algorithms. )
Stationary Video vs Dynamic Video
Before getting into the details of our stationary video inpainting method, we first discuss the difference between dynamic and stationary videos.
Dynamic videos are captured by cameras that are constantly moving. The cameraman may be walking throughout the video, for example.
Dynamic video example: a handheld video taken while walking. We want to remove the cameraman in the center.
Stationary videos, on the other hand, are filmed with little or no camera movement. As an example, a cameraman may hold the camera while staying within a relatively small area as compared to the surrounding area, or a tripod may be used to mount a camera.
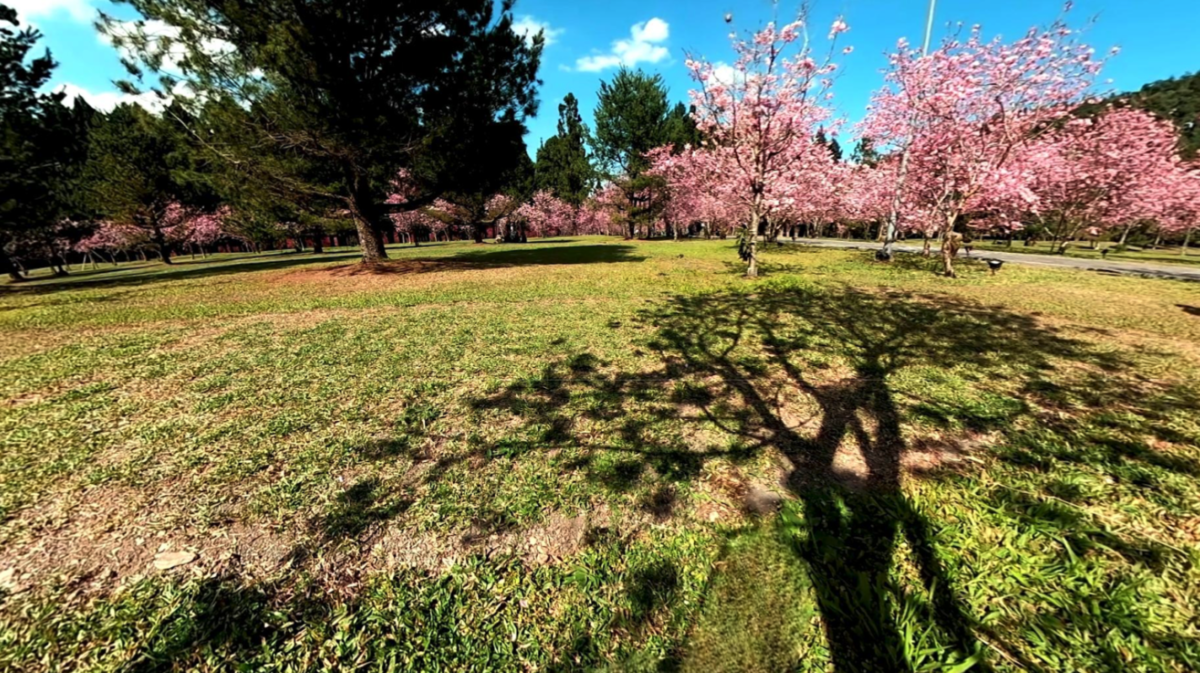
Stationary video Example #1: a 360° video taken by a hand-held camera. We want to mask out the red cameraman along with his shadow.
Stationary video example #2: a 360° video taken by a camera mounted on a tripod, we want to mask out the tripod in the center.
Although it can be difficult to classify a video as stationary or dynamic at times, (e.g. videos in which the cameraman alternately walks and stands), we still find it very helpful to do so, since these two types of video have very different natures and thus require different approaches to remove the cameraman.
Why Do We Treat Stationary Videos and Dynamic Videos Differently?
The reason we have classified videos as dynamic and stationary is that previous cameraman removal algorithms [1] were unable to provide realistic content for the masked area when the camera is stationary. By analyzing the properties of stationary videos, we developed a separate CMR algorithm tailored to target their special settings.
We discuss in the following sections two challenges induced by stationary videos that must be taken into account when developing high-quality CMR algorithms.
Challenge 1: “Content Borrowing” Strategy Fails on Stationary Videos
What is “Content Borrowing” ? How does Previous CMR Method Work?
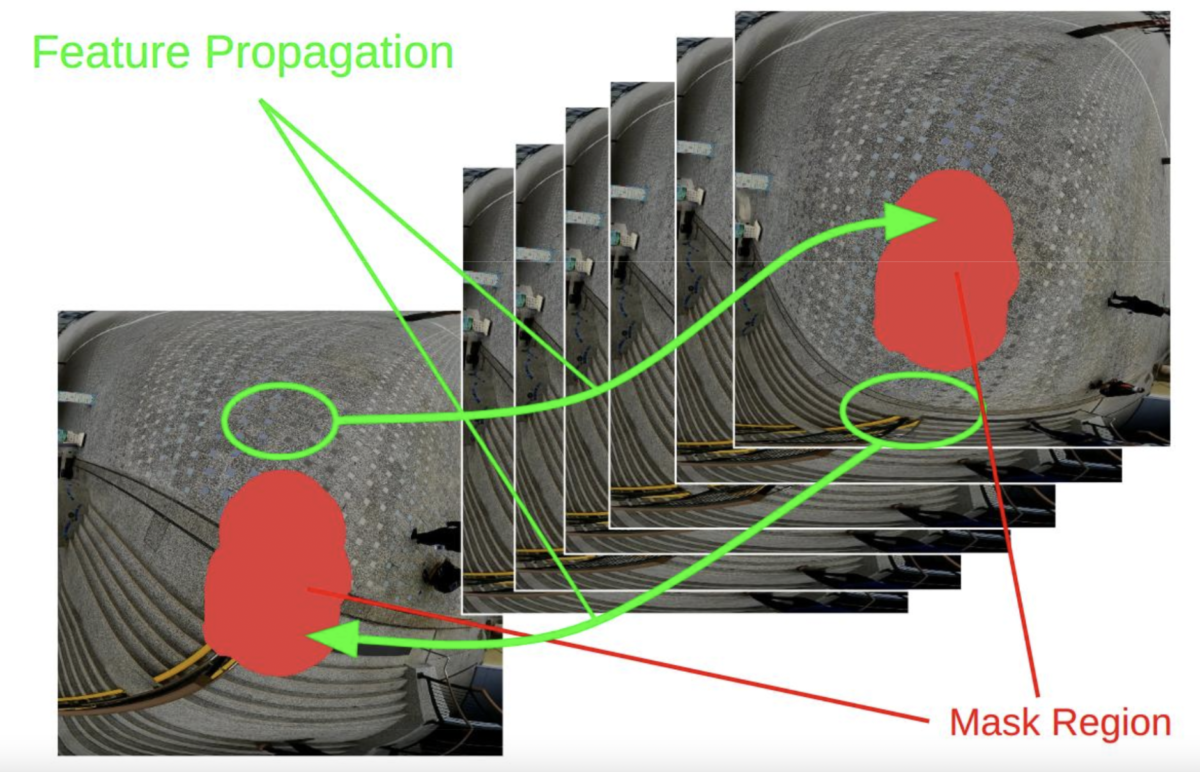
As shown in the diagram, flow-guided video painting methods (e.g. FGVC[2] , which is used by our previous CMR method[1] ) draw frames sequentially from bottom-left to top-right. To generate the content of the masked region (red region), we detect the relative movement of each pixel between neighboring frames, and borrow (green arrows) the content of the currently masked region from neighboring frames that might expose the target region as the camera moves.
In the dynamic video, where the cameraman is walking, masked regions almost certainly become visible in future frames as the masked content changes along the video. That is why “content borrowing” works well on dynamic videos.
CMR result on dynamic videos with “feature borrowing” strategy (generated by previous CMR method based on FGVC)
Content Borrowing on Stationary Videos
When CMR is used on stationary videos, if the mask is also stationary (which is often the case since the cameraman tends to maintain the same relative position to the camera throughout the entire video), then the content of the masked region might not be exposed for the duration of the video. Thus, in order to fill in the masked area, our stationary CMR algorithm must “hallucinate” or “create” realistic new content on its own.
Challenge 2: Human Eyes are More Sensitive to Flickering and Moving Artifacts in the Stationary Scene
When designing CMR algorithms for stationary videos, we encountered another challenge because human eyes are more sensitive in stationary videos than in dynamic videos. Specifically, any flickering or distortion in a video without camera movement will draw the viewer’s attention and disturb their viewing experience.
- As we run the previous CMR method on stationary videos, we can observe obvious artifacts associated with warping and flow estimation errors.
- In spite of the fact that we use the same mask generation method for both stationary and dynamic videos, the tiny disturbance in the mask boundary is considered an artifact in stationary videos, while it is silently ignored by viewers in dynamic videos.
The result of the previous method (based on FGVC[2]) on stationary videos: Note the texture mismatch around the mask boundary due to warping, and the content generation failure in the bottom left corner.
The human eye can detect even tiny inconsistencies in the mask boundary when watching stationary videos. Although the mask boundary in the inpainted result appears natural in each individual frame, there is still disturbing flickering when the boundary changes between frames. In a dynamic video, this artifact is hardly noticeable.
According to the properties of stationary video outlined above, we propose three possible solutions, whose concept and experimental results are presented in the next section.
Three Stationary CMR Solutions
Our three different solutions share the same preprocessing steps:
- We first convert 360° video into an equirectangular format
- Then rotate the viewing direction so that the mask is close to the center region.
- Finally, a square-shaped region containing the mask and its surrounding area is cropped and resized to a suitable input resolution for each solution.
In addition, after the CMR has been completed, we upsample the result using the ESRGAN super-resolution model [3] before pasting it onto the original 360° video.
All three solutions utilize image inpainting models as a common component. It is preferred to use image inpainting models because they are capable of hallucinating realistic content more effectively than video inpainting models, which rely heavily on the “content borrowing” strategy. Also, video inpainting models are trained using only video datasets, which contain less diverse content than image datasets. The following experiments are conducted based on the LaMa [4] model for image inpainting.
In a simplified perspective, our three different solutions are essentially three different ways to extend the result of the LaMa [4] image inpainting model (which works on a single image instead of video) into a full sequence of video frames in a temporally consistent and visually reasonable manner.
Solution #1: Video Inpainting + Guidance
Our solution #1 aims to make video inpainting methods (which are normally trained on dynamic videos) applicable to stationary videos by modifying them. After testing various video inpainting methods, we selected E2FGVI [5] for its robustness and high-quality output.
We can divide our experiment on video inpainting into four stages.
1.Naive Method
Firstly, if we run a video inpainting model directly on the stationary input video, we will obtain poor inpainting results as shown below. The model is unable to generate realistic content because it is trained exclusively on dynamic video, and therefore heavily relies on the “content borrowing” strategy previously described.
2. Add Image Inpainting Guidance
In order to leverage the power of the video inpainting model, we design a new usage for our video inpainting model that makes the “content borrowing” strategy applicable to stationary videos. In particular, we insert the image inpainting result in the first frame of the input sequence and remove the mask corresponding to it, so that the video inpainting model can propagate the image in painted content from the first guiding frame to the later frames in a temporally consistent manner.
 |
| Modified input to video inpainting model: we insert the image inpainting result at the beginning of the input sequence to provide guidance to the video inpainting model. |
After inserting guiding frames, we can see that the result is much more realistic.
There is, however, an inconsistent and strange frame in the middle of the above video. There is a complex reason for this:
- Due to the limitations of E2FGVI [5], we can only process at most 100 frames per run with VRAM on a single NVIDIA RTX3090 GPU. (We have observed similar memory constraints in our experiments using other deep-learning-based video inpainting implementations.)
- Due to this, we must divide our input video into multiple slices and process each slice separately. In this case, each slice contains 100 frames.
- Since each run is independent of the other, we must insert image inpainting guidance on each slice.
- There is a discrepancy between the resolution and texture quality of the inserted guiding slice generated by LaMa [4] and the video inpainted slice generated by E2FGVI [5], contributing to flickering artifacts in the transition between pairs of slices.
We will deal with this artifact in the next stage.
3. Softly Chaining the Video Slices together
In order to resolve the inconsistent transitions between consecutive slices, as described at the end of the previous stage, we attempted to use the last frame of the previous slide as the guiding frame for the next slice. Below is the result. This method suffers from accumulated content degeneration. After several iterations, the inpainted region becomes blurry.
Based on these results, it appears that the guiding information in the inpainted region decays when propagated across slice boundaries. Therefore, we propose a “soft chaining” method that mitigates the flickering artifact while preserving the guiding frames in each slice.
In particular, we modify the chaining mechanism so that each pair of neighboring slices has an overlap period during which the video is smoothly cross-faded from the previous slice to the next slice. Thus, we can still insert the guiding frame, but the guiding frame will be obscured by the overlapping crossfade. As a result, the flickering artifact is eliminated, and we are able to transit between slices smoothly.
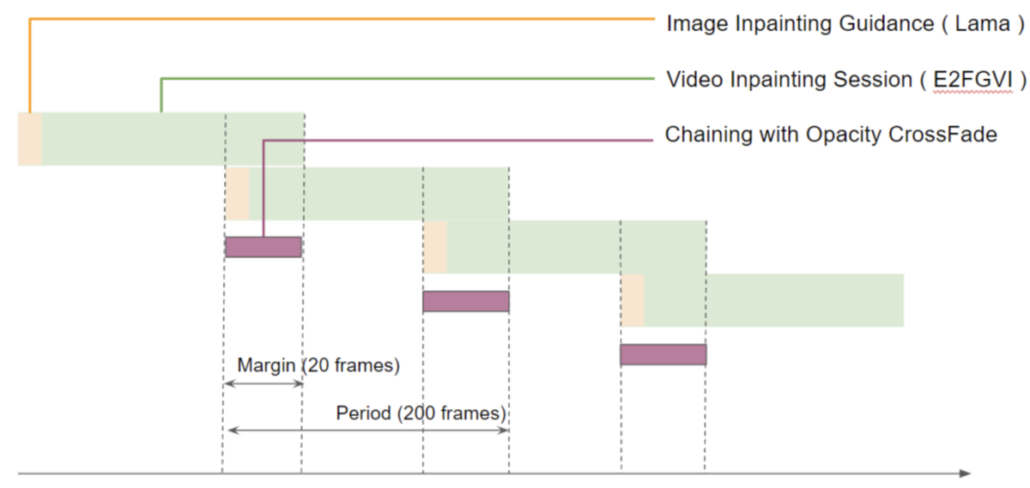 |
| The soft chaining method for having smooth transitions between slices. |
The result of Soft Chaining: We can see that the gap between each slice is less obvious.
4. Temporal Filtering
Lastly, we eliminate vibration artifacts in our model by using a temporal filtering technique. The details of temporal filtering will be discussed in solution #3. Below is the final result (see Appendix 1 for 360° results):
One of the main artifacts of Solution #1 is the crossfade transition between neighboring slices. Although the transition is visually smooth, it is still disturbing in the stationary video. Another artifact is the unnatural blurry blob in the center of a large mask. It is likely that the artifact is caused by the limitations of the architecture of E2FGVI_HQ, which produces blurry artifacts in regions far from the inpainted boundary. These artifacts will be considered in the comparison section below.
Solution #2: Image Inpainting + Poisson Blending
In solution #2, we attempted to “copy” and “paste” the inpainted region of the first frame to other frames within the scene by using Poisson blending.
The Poisson Blending [6] technique is a technique that allows the texture of one image to be propagated onto another while preserving visual smoothness at the boundary of the inpainted area. Here is an example of the seamless cloning effect shown in the original paper [6]:
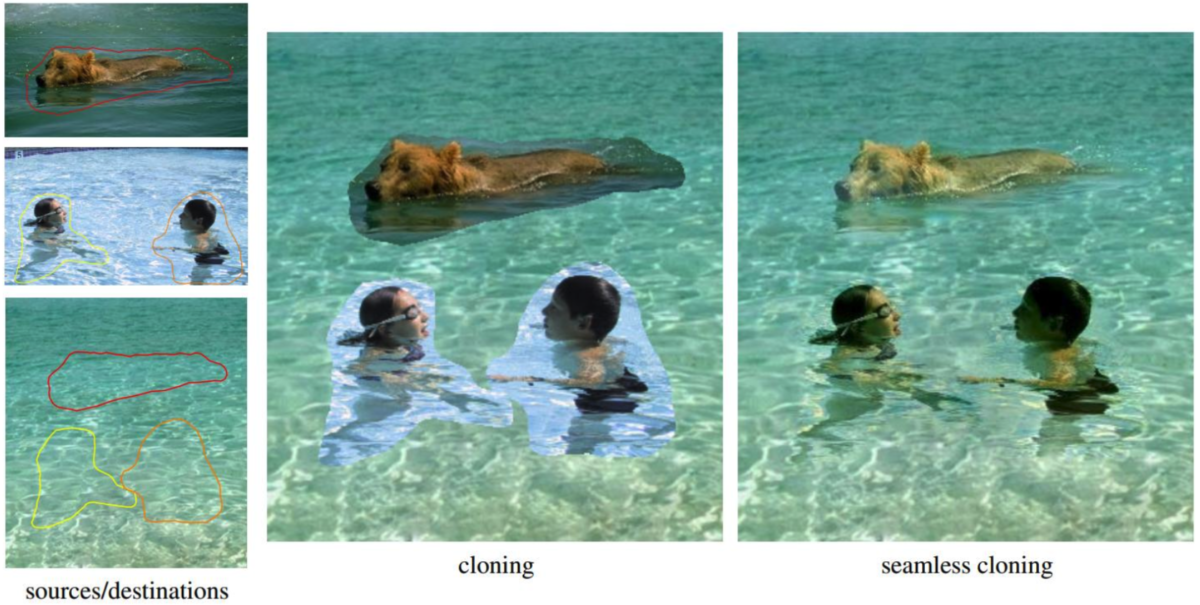
As a result of the properties of Poisson blending, when we clone the image inpainting result of LaMa [4] to the rest of the video frames, the copied region automatically adjusts its lighting in accordance with the surrounding color on the target frame.
Poisson Blending Good Result #1: It works well on a time-lapse sunrise video since Poisson blending ensures a smooth color transition within the mask area.
Poisson Blending Good Result #2: In comparison with the other two methods, Poisson blending offers a very stable inpainting region across frames.
Poisson blending, however, is only applicable to tripod videos, not to handheld stationary videos, since it assumes that the inpainted content won’t move throughout the video. We can see in the example below that the inpainted texture is not moving with the surrounding video content, resulting in an unnatural visual effect.
Poisson Blending on Handheld Video (Bad Result): The inpainted texture does not move with the surrounding video content, causing unnatural visual effects.
Poisson Blending on Tripod Drift: A tripod video may also contain tiny camera pose movements that accumulate over time, resulting in the inpainted content drifting away from the surrounding area of the frame.
Solution #3: Image Inpainting + Temporal Filtering
In solution #3, we take a different strategy. Instead of running image inpainting on only the first frame of the input sequence, we run it on all frames. The following result is obtained.
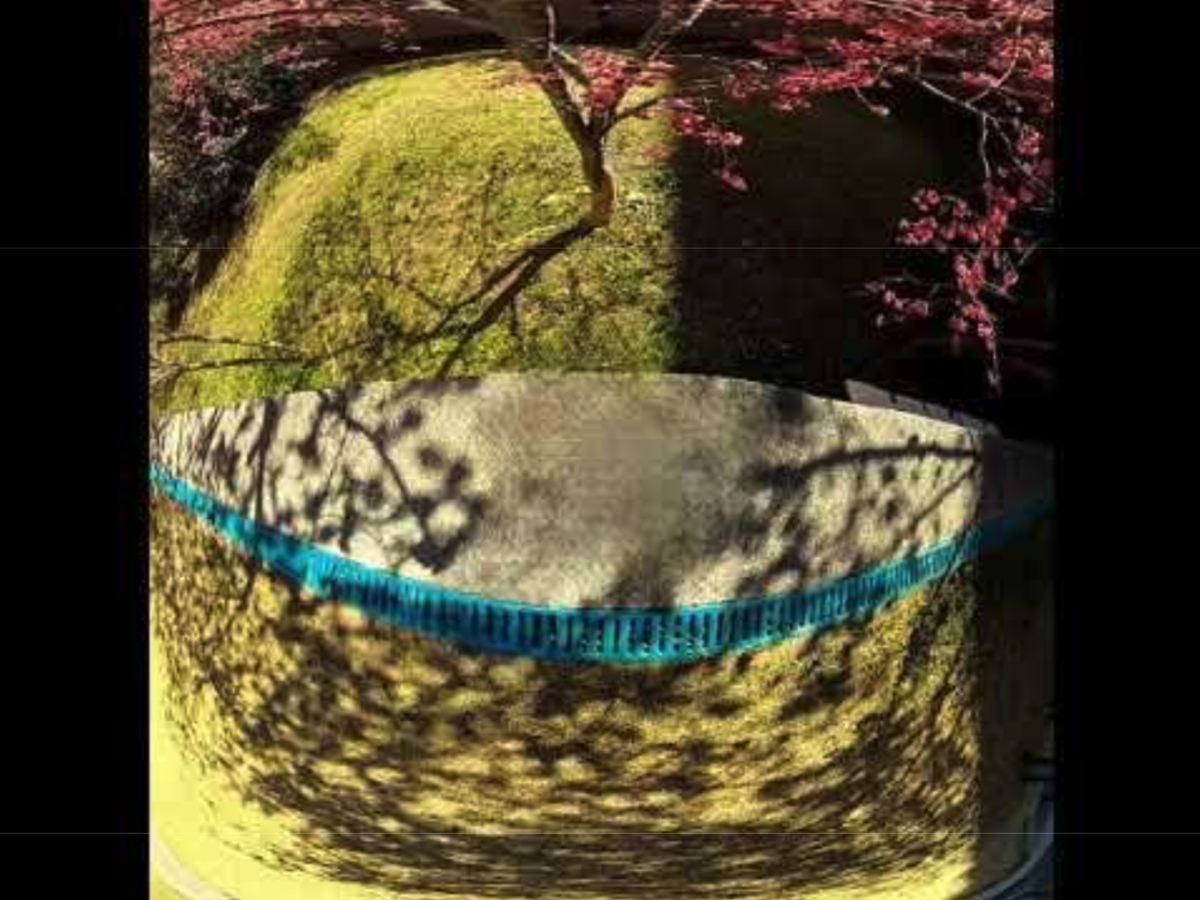
This result is very noisy since LaMa [4] generates content with a temporally inconsistent texture. In order to mitigate the noisy visual artifact, we apply a low-pass temporal filter to the inpainted result. A temporal filter averages the values pixel-by-pixel across a temporal sliding window so that consistent content is extracted and the high-frequency noise is averaged out. Below is the result after filtering (for 360° video results, please refer to Appendix 2):
At first glance, the result appears stable, but if we zoom in and observe closely, we will see that the color of every pixel gradually changes, resulting in a wavy texture.
As shown below, we also observe white-and-black spots in the results, which we refer to as the “salt and pepper artifact”. This artifact is the most disturbing artifact of Solution #3 and will be discussed later.
Solution #3 Result Zoomed In: We can see salt and pepper Artifacts and tiny flickering caused by super-resolution models.
As we have described all three solutions, the next step will be to compare them and select the one that best meets our requirements.
Comparing and Choosing from Experimental Solutions
The results of previous experiments demonstrated that each solution has its own advantages and weaknesses, and there was no absolute winner which outperformed every competitor in all circumstances.
Quality Comparison
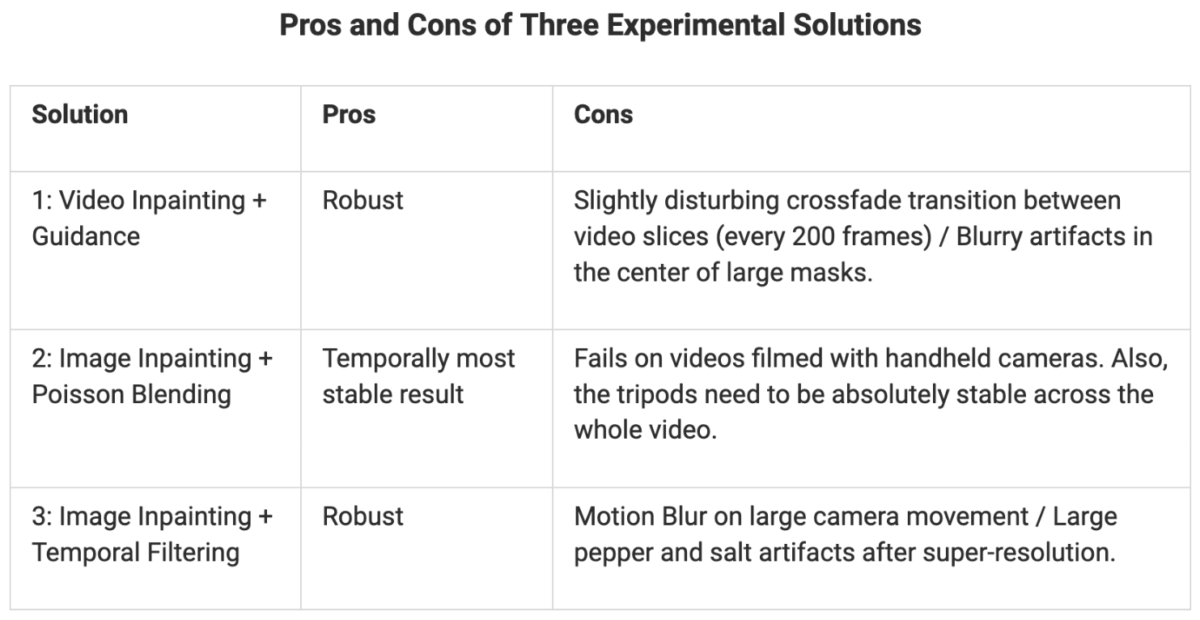
Based on the results of the experiment, we estimate for each solution its potential quality of achieving our project goal in order to determine one final choice for further refinement. The experimental results of each solution were converted into 360° videos and then evaluated by our photographers and quality control colleagues. The following table summarizes the pros and cons of each solution.
Speed Comparison
We also tried to take into account the running speed of each solution when choosing the solution. However, at the experiment stage, it is difficult to determine the optimal speed of each solution since we expect to see a large speed up if we implement the entire pipeline on the GPU. During the experimental pipeline, intermediate results are saved and loaded to disk, and image frames are unnecessarily transferred between GPU and CPU. Due to the similar speed of each algorithm, we did not consider the computation cost of each solution when making our decision.
Conclusion
Based on the qualitative comparison and feedback from the photographer and the quality control department, the following decisions were made.
- Solution #2 was the first one to be eliminated from the list due to its low robustness (it only works with perfectly stable tripod videos).
- Based on the feedback voting, solution #1 and solution #3 performed equally well, so we compared their potential for further refinement:
- It is difficult to fix blurry artifacts in the mask center of Solution #1 due to the architecture of the video inpainting model.
- In Solution #1, the crossfade transition caused by memory constraints is also difficult to resolve.
- By adjusting the resizing rules of our pipeline, we may be able to resolve the pepper and salt artifact (which is the most complained-about downside of Solution #3).
Therefore, we chose solution #3 since it is more likely to be improved through further finetuning.
Fine-tuning for Solution #3 (Image Inpainting + Temporal Filtering)
The Solution #3 algorithm has been further optimized in three different aspects:
- Identify the origin of salt and pepper artifacts and remove them
- Remove the flickering mask boundary
- Speed up.
Identify the Origin of Salt and Pepper Artifacts
Here is the diagram of the solution #3 CMR pipeline, in which we search for the cause of the artifact.
It turns out that the artifact is caused by the resizing of the image before inpainting. During the resizing stage, we resize the cropped image from 2400×2400 to 600×600. However, at resolution 600×600, the image suffers severe aliasing effects, which are preserved by LaMa in the inpainted region (as shown below), resulting in black and white noise pixels. In the following stage, the super-resolution model amplifies the noise pixels further.
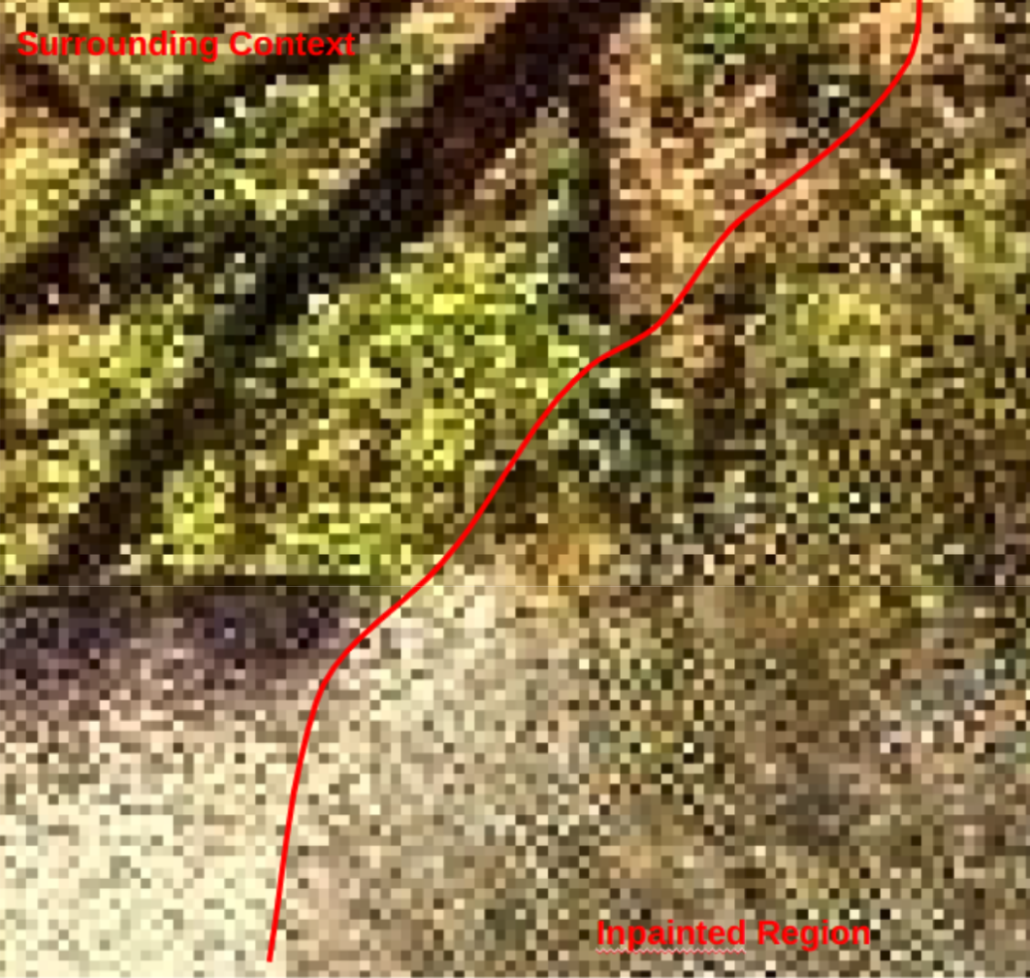
Output of the LaMa image inpainting model: The aliasing effect in the context region is replicated by LaMa in the inpainted region.
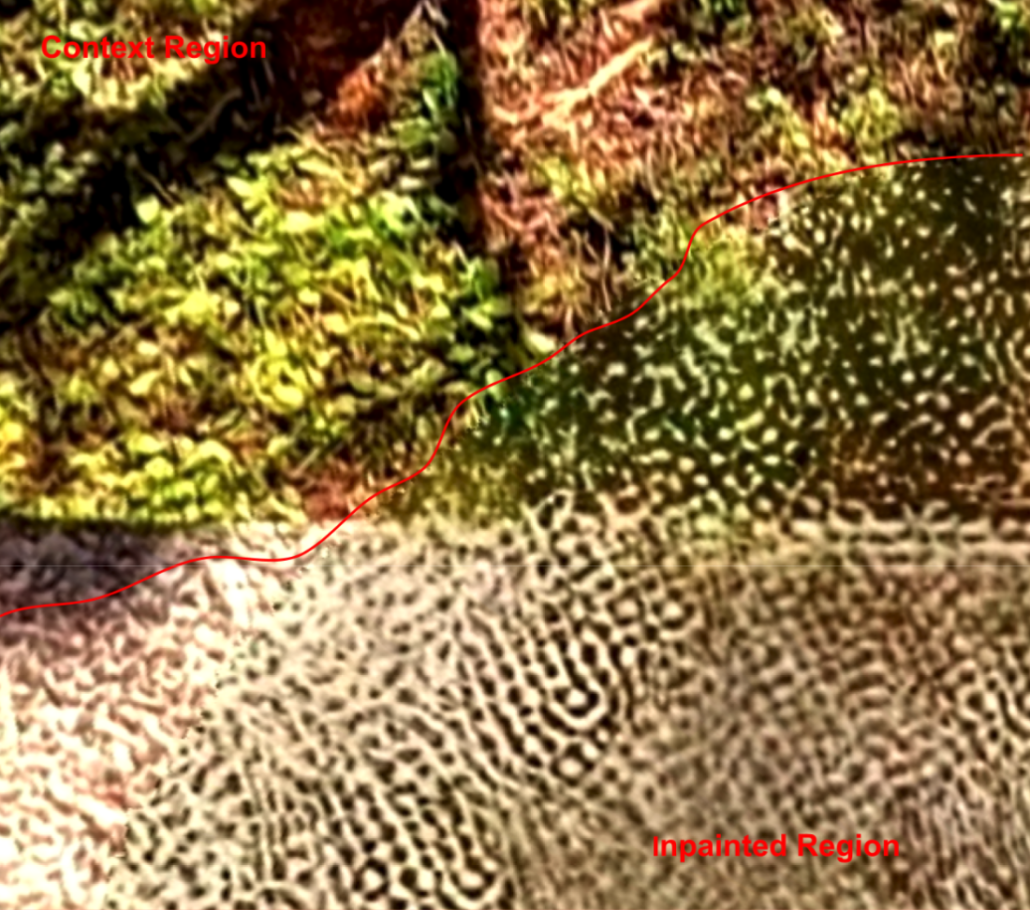
Inpainted Region after super-resolution and overwriting mask area: It can be seen that the black and white noise pixels in the inpainted area have been further amplified by the super-resolution model. The context area that is not overwritten remains unchanged.
Removing Salt and Pepper Artifacts
The idea is to reduce the scaling factor of the resize process so that more detailed information can be preserved and there will be less aliasing. To achieve this, we made two modifications: 1. Increase the LaMa input dimension and 2. Track and crop smaller regions around the mask.
Increase LaMa Input Dimension
We tested different input resolutions and found that LaMa [4] can handle input sizes greater than 600×600. However, we are unable to feed the original 2400×2400 image into LaMa. When the input image is too large, we receive an unnatural repetitive texture in the inpainting area. Experimentally, we find that the optimal operating resolution and content quality trade-off lies around 1000×1000, so we change the resizing dimension before LaMa to 1000×1000.
 Input size=600×600:
many salt and pepper artifacts due to extreme resizing scale.
 Input size=1000×1000:
good inpainting result
 Input size=1400×1400:
we can see unnatural repetitive texture inside the inpainted area.
Track and Crop Smaller Region Around the Mask
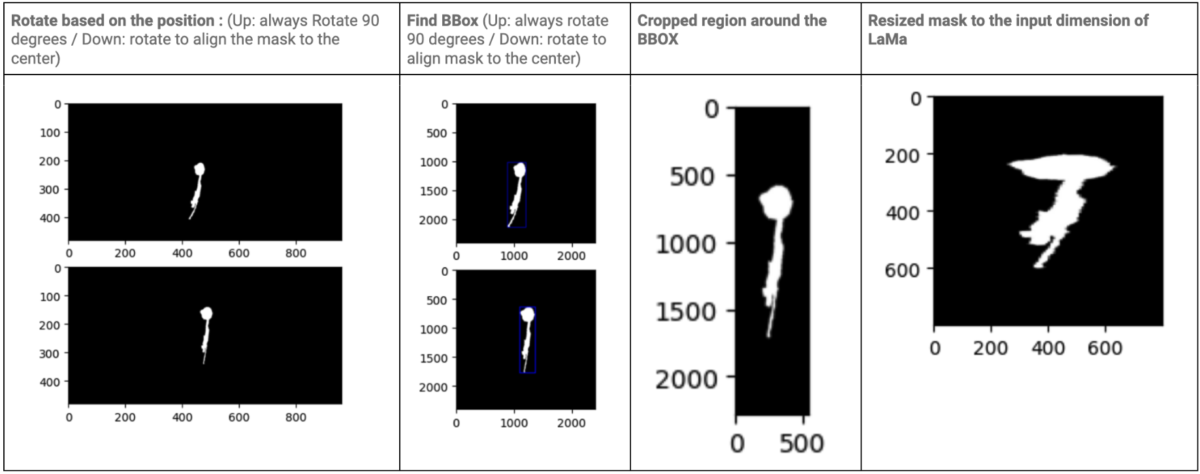
Another modification that improves the inpainting quality is to crop a smaller area of the equirectangular video. By using smaller cropped images, we can use smaller resize scales in order to shrink our input to 1000×1000, preserving more detail in the final result. The cropping area should include both the masked region as well as the surrounding regions of the mask from which LaMa [4] can generate plausible inpainting content. Our cropping mechanism is therefore modified so that it tracks both the mask’s position and shape. Specifically, instead of always cropping the center 2400×2400 region of the rotated equirectangular frame, we rotate the mask region to the center of the equirectangular frame and crop the bounding rectangle around the mask with a margin of 0.5x the bounding rectangle’s width and height. Below is an illustration of the mask tracking process.
Rotate and crop the equirectangular frame based on the position and shape of the mask: By using this method, the cropped image would be smaller, thus reducing the resizing scale and improving the quality of the image.
Remove ESRGAN Super-Resolution Model
With the above two modifications, we discovered that the scale factor was drastically reduced, so that the super-resolution module was no longer required. Therefore, we replaced the ESRGAN super-resolution model with normal image resizing, thereby further eliminating salt and pepper artifacts.
Removing Flickering Mask Boundary
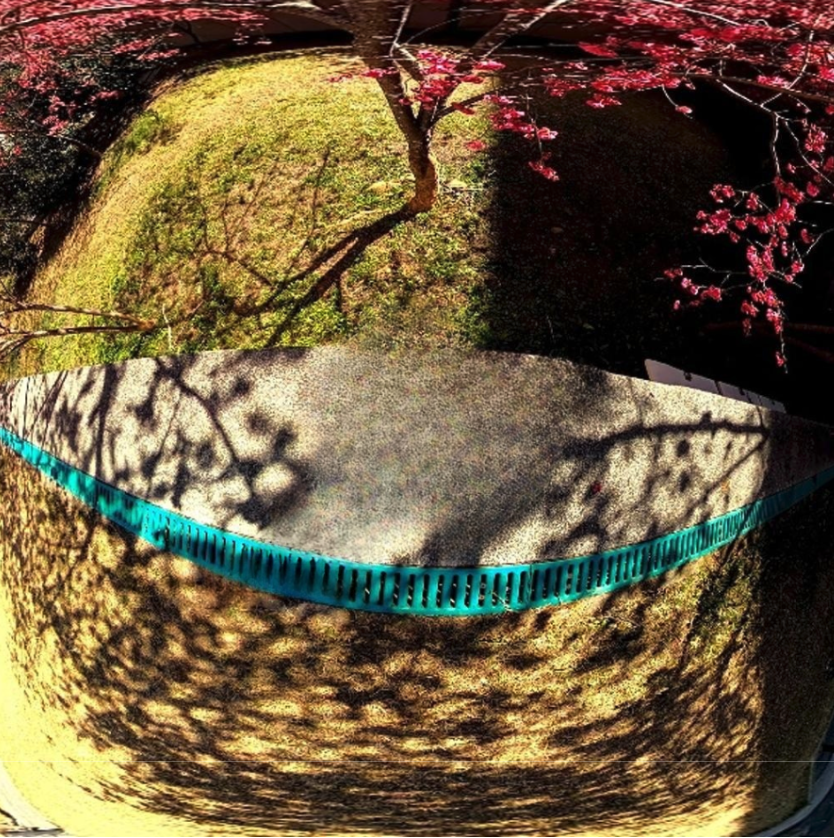
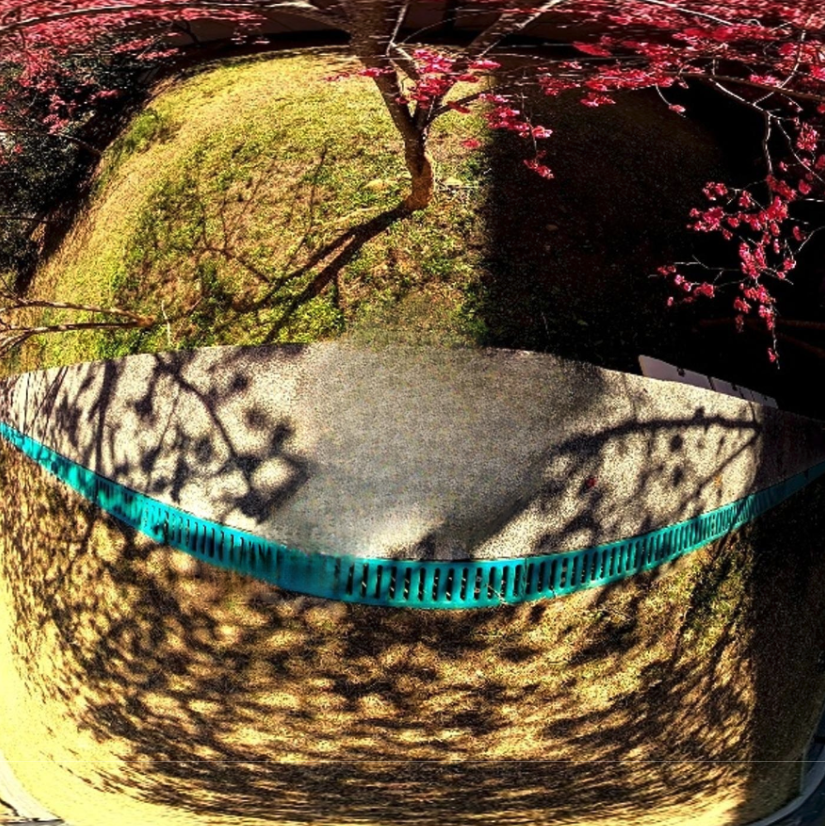
Can you find the boundary of the inpainted mask in the picture below?
It should be difficult to detect the inpainted mask even when zooming in.
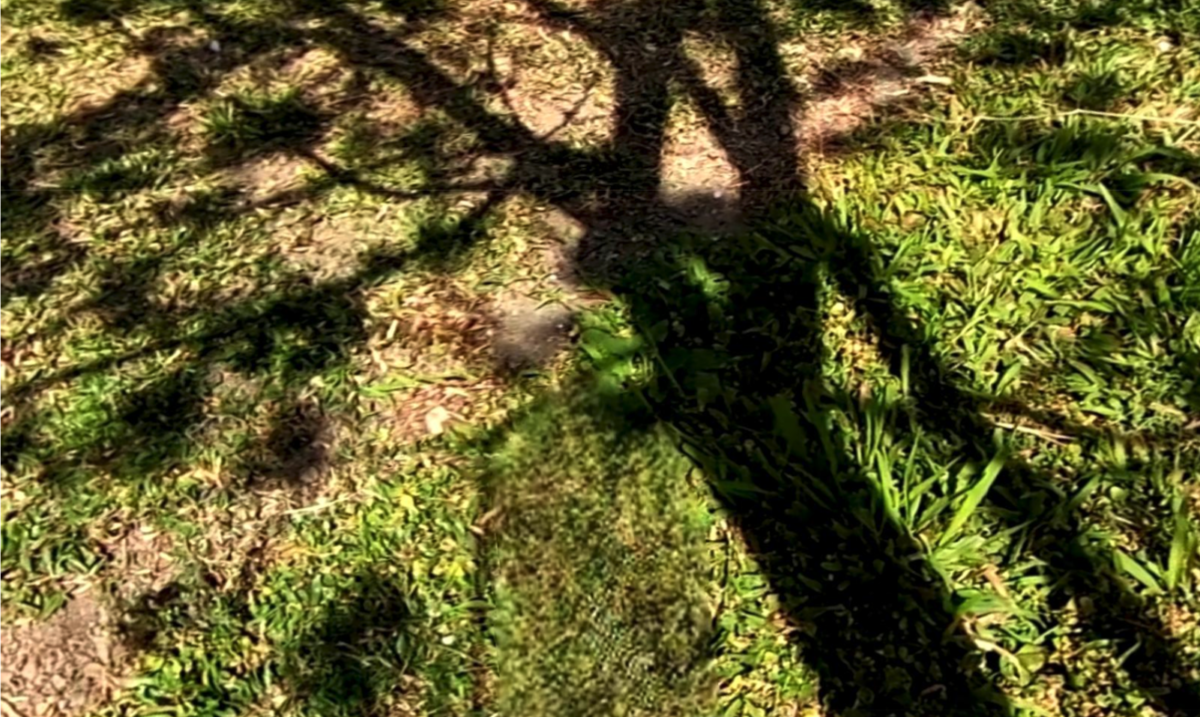
Nevertheless, if the mask boundary is inconsistent across frames, we can observe a flickering effect that reveals the existence of an inpainting mask.
In order to remove the artifacts, we apply temporal filtering on the binary mask before feeding it to the CMR pipeline.Furthermore, we continuously blur the mask when we paste the inpainted region back into the 360° video.
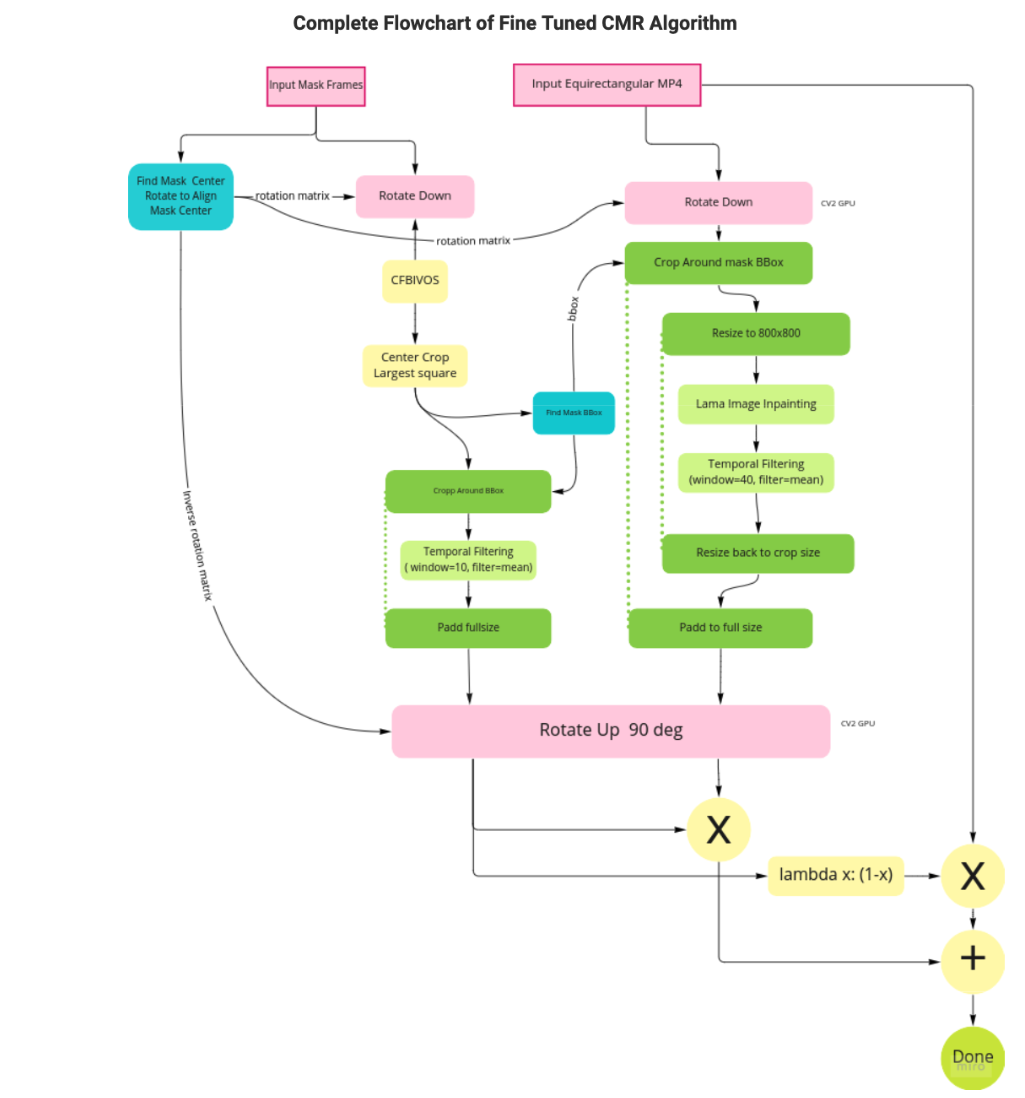
Please refer to the following flow chart for a detailed explanation of our fine-tuned CMR algorithm based on Solution #3. We can see that
- In the blue parts, we rotate the input mask based on the position of the mask, and then crop the mask based on the BBox around the rotated mask.
- We apply temporal filtering to both the mask output of CFBVIO [7] and the frame output of LaMa.
Speeding Up
As part of the fine tuning process, we also made the following modifications in order to speed up the algorithm:
- Preprocessing of LaMa models is now performed on GPUs rather than CPUs
- All the processes in the CMR are chained together, and all the steps are executed on a single GPU (RTX3090).
- The CMR algorithm and the video mask generation algorithm [7] are chained together with a queue of generated mask frames provided by a Python generator, so that the two stages can run simultaneously on a single GPU.
Following these fine-tunings, the final CMR and mask generation model [7] run at 4.5 frames per second for 5.6k 360° videos.
Conclusion
We have presented here the final results of our fine-tuned stationary CMR algorithm in 360° format (see Appendix 3 for additional results, and Appendix 2 for the results before fine-tuning). As can be seen, the fine tuned method successfully removed the pepper and salt artifacts, as well as stabilizing the mask boundary.
–
Visually, the inpainted area is reasonable, as well as temporally smooth. Compared to previous methods, this algorithm successfully achieves the goal of CMR under the constraints of stationary video, and greatly enhances the viewing experience.
The following three points summarize this blog article:
- Our study compares the properties of stationary and dynamic videos, and analyzes the challenges of developing CMR algorithms from stationary videos.
- On the basis of these observations, we propose three different solutions for CMR and compare their strengths and weaknesses.
- Solution #3 is selected as our final algorithm and its performance is further fine-tuned in terms of quality and speed.
In the case of stationary video, our algorithm is capable of handling both tripod and handheld video and it achieves much better results than the previous method while being much faster.
References
Appendix 1: 360° Video Results of Solution #1
Appendix 2: 360° Video Results of Solution #3 Before Fine Tuning
Appendix 3: 360° Video Results of Solution #3 After Fine Tuning

